

What if the very cleaners you trust to keep your home hygienic are actually stripping away your floor’s most expensive layer of protection? Many homeowners across South-Vancouver Island invest in professional sealing only to inadvertently dissolve that barrier because they have not been shown how to maintain sealed grout properly. It is a frustrating cycle where grout lines begin to discolour despite regular mopping, leaving you wondering where the maintenance process went wrong.
We understand that you want a home that is both beautiful and truly sanitary. Protecting your investment does not have to be a confusing guessing game involving harsh acids or bleach. This guide shares the meticulous professional secrets we have utilized since 1983 to preserve penetrating sealers and keep tile surfaces looking pristine. You will discover a clear list of safe versus dangerous cleaners, a simple routine to prevent dirt buildup, and the specific signs that indicate it is time to call a specialist for a professional reseal.
Key Takeaways
- Learn how professional-grade penetrating sealers create a breathable barrier that prevents liquids and oils from wicking into porous grout lines.
- Discover why using a pH-neutral cleaner is the most critical step in how to maintain sealed grout while avoiding the chemical etching caused by acidic solutions.
- Identify common maintenance mistakes, such as using vinegar or bleach, which can weaken chemical bonds and lead to premature sealer failure.
- Master the industry-standard “Water Bead Test” to accurately determine when your protective barrier has worn thin and requires a professional refresh.
- Understand when to transition from DIY care to a professional “reset” using specialized high-heat steam extraction to remove deeply embedded soil.
Understanding the Shield: What Sealed Grout Actually Does
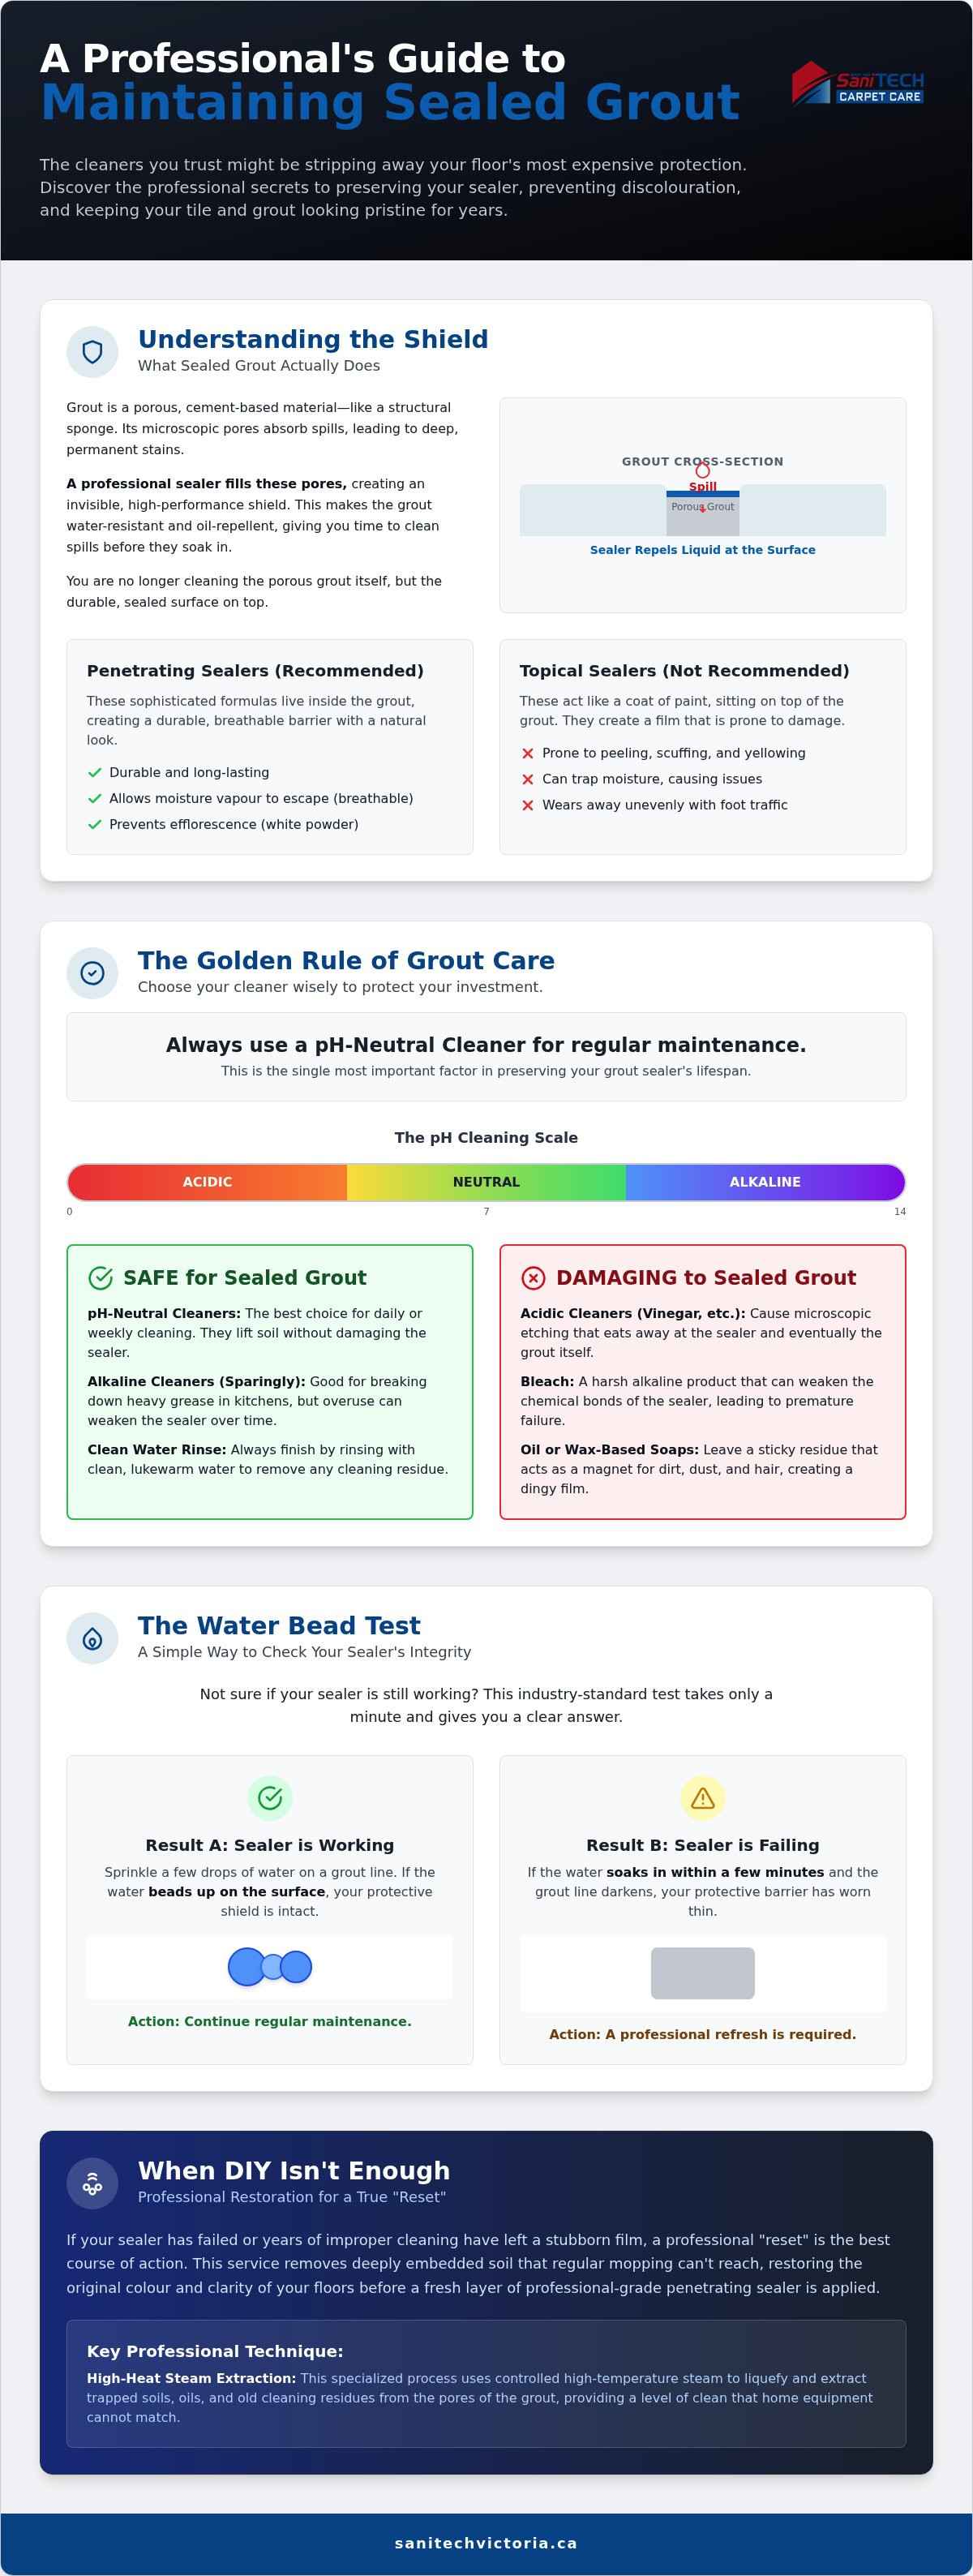
Grout is essentially a structural sponge. Because it is a cementitious material, it contains millions of microscopic pores that eagerly drink up any liquid they encounter. To understand the necessity of protection, one should first look at What Is Grout? and its foundational role in tile installation. Without a professional sealer, every spill or mop bucket of dirty water wicks into the grout line through capillary action. This process carries contaminants deep into the floor where they become permanent stains.
Professional sealing creates an invisible, high-performance shield that fills these pores. When we apply a sealer, we are not making the grout waterproof; we are making it water-resistant and oil-repellent. This distinction is vital for homeowners learning how to maintain sealed grout effectively. You are no longer scrubbing the porous cement itself. Instead, your cleaning efforts are focused entirely on the surface of the sealer. This barrier buys you the time needed to wipe up spills before they have a chance to migrate into the subfloor.
Maintaining this shield is the foundation of a hygienic home. A common misconception is that once grout is sealed, it is invincible. In reality, the sealer is a sacrificial layer that stands between your grout and the world. If you treat that layer with care, your floors will retain their original colour for years. If you use the wrong chemicals, you will strip that protection away within months, leaving the grout vulnerable once again.
Topical vs. Penetrating Sealers
There are two primary ways to protect your tile surfaces. Topical sealers act like a coat of paint; they sit on top of the grout and create a visible film. While they offer high initial shine, they are notoriously prone to peeling and scuffing. At Sani-Tech Victoria, we prefer high-quality penetrating sealers, also known as impregnators. These sophisticated formulas live inside the grout lines rather than on top of them. They provide a more durable, natural look that does not wear away with foot traffic, though they remain chemically sensitive to harsh household cleaners.
The “Breathability” Factor
A professional-grade seal must be breathable to ensure the longevity of your installation. High-end penetrating sealers are engineered to block liquid water from entering while still allowing moisture vapour to escape from the substrate. If a non-breathable seal is used, moisture can become trapped beneath the surface. This often results in a frustrating white powdery deposit that ruins the aesthetic of your tile. Efflorescence is the migration of salt to the surface of a porous material. By using a breathable barrier, we prevent these salts from accumulating and keep your grout lines looking pristine. Understanding this chemical balance is the first step in mastering how to maintain sealed grout without causing accidental damage.
The Best Cleaners for Preserving Sealed Grout
The chemical composition of your cleaning solution is the single most important factor in determining the lifespan of your floor’s protection. While the sealer we apply at Sani-Tech Victoria creates a formidable barrier, it is not indestructible. The golden rule of how to maintain sealed grout is to always use a pH-neutral cleaner. These solutions sit exactly at the centre of the pH scale, meaning they are neither acidic nor highly alkaline. Acidic cleaners are particularly destructive; they cause microscopic etching that eats away at the sealer and eventually the grout itself, leaving the surface dull and vulnerable to staining.
Alkaline cleaners serve a specific purpose in a maintenance routine, but they require a disciplined approach. These high-pH solutions are excellent for breaking down heavy grease or organic oils in a kitchen environment. However, you should use them sparingly. Frequent use of strong alkaline products can eventually weaken the chemical bonds of the sealer. For daily maintenance, stick to neutral formulas that lift surface soil without challenging the integrity of the protective shield. If your floors have already developed a stubborn film from years of improper product use, our specialized grout and tile cleaning can restore that original clarity before you begin a new maintenance routine.
Avoid any soaps that are oil-based or wax-based. These products are often marketed for their ability to add “shine,” but they are a disaster for grout. They leave behind a sticky, microscopic residue that acts as a magnet for dust and pet hair. Over time, this buildup creates a dark, dingy appearance that mopping alone cannot fix. Always finish your cleaning process by rinsing the surface with clean, lukewarm water. This simple step removes any lingering surfactants and prevents the formation of a “soap film” that can cloud the beauty of your tile.
How to Identify pH-Neutral Cleaners
Identifying the right product is simpler than it seems. Look for labels that explicitly state “safe for natural stone” or “neutral pH.” Many common “all-purpose” cleaners contain hidden citric or phosphoric acids designed to dissolve hard water spots, which will quickly strip a sealer. A mild dish soap can work in a pinch for small spills, but it is not a recommended long-term strategy because it is difficult to rinse completely and often leads to residue buildup.
Recommended Tools for Daily Care
The tools you choose are just as vital as the chemicals. Microfibre mops are vastly superior to traditional string mops. String mops tend to push dirty water into the low points of the floor, which are your grout lines. Microfibre actually lifts and traps the dirt within its tiny fibres. For targeted spot cleaning, use a soft-bristled nylon brush. Never use metal or stiff wire brushes, as these will scratch and remove the sealer. We also advise caution with residential steam mops. While they are effective at sanitizing, the extreme, concentrated heat can sometimes weaken the bond of certain sealers if used too frequently on a single spot.
Maintenance Mistakes: What Destroys Grout Sealer?
Many homeowners believe that “natural” solutions are inherently safer, yet this is the most common pitfall when learning how to maintain sealed grout. Vinegar and lemon juice are highly acidic. They don’t just clean; they chemically react with the sealer and the cementitious grout underneath. This reaction slowly dissolves the protective barrier you paid to install. Similarly, bleach is a harsh oxidizer that weakens the chemical bonds of the sealer. Frequent bleach use leads to premature flaking, making the grout look patchy and worn long before its time. These chemicals effectively strip the “shield” we discussed earlier, leaving your floors vulnerable to permanent staining.
Physical abrasion is another silent sealer killer. Using green scouring pads or wire brushes creates microscopic scratches on the sealer’s surface. These tiny grooves act as traps for bacteria and fine soil. Once the surface is scratched, it becomes significantly harder to clean with a standard mop. You will find yourself scrubbing harder, which only accelerates the damage. Meticulous care requires soft tools that respect the integrity of the barrier rather than grinding it away.
The Victoria Hard Water Challenge
Residents in Victoria and Sidney face a unique environmental hurdle: high mineral content in the water supply. Hard water contains calcium and magnesium that bond to the surface of your sealer as moisture evaporates. Over time, this creates a cloudy “scale” that masks the true colour of your grout. To safely remove these spots, avoid aggressive “scale removers” which are usually acid-based. Instead, use a pH-neutral cleaner and a soft cloth. The best prevention is to dry tile surfaces in showers with a squeegee or microfibre towel after every use to prevent minerals from settling in the first place.
The Danger of High-Pressure DIY Cleaning
It’s tempting to use a home pressure washer to “blast” away grime, but these machines can strip a professional seal in seconds. The concentrated force of water often exceeds the bond strength of the sealer, causing it to delaminate from the grout. There is a vast difference between DIY blasting and professional tile and grout cleaning, which uses controlled heat and vacuum extraction rather than raw pressure. Realizing whether a stain is trapped under the seal or simply sitting on top is crucial. If a stain has penetrated the barrier due to high-pressure damage, the only solution is often a professional deep clean and a complete reseal. Mastering how to maintain sealed grout means knowing when to put down the power tools and call in an expert who understands the delicate chemistry of your floor.
The Water Bead Test: How to Check Your Sealer Integrity
Even when you follow the strict cleaning protocols we have outlined, no sealer lasts forever. It is a sacrificial layer designed to take the brunt of daily wear. Depending on the volume of foot traffic and your specific cleaning habits, a professional-grade penetrating sealer typically provides protection for one to five years. Knowing how to maintain sealed grout involves more than just mopping; it requires active monitoring of that protective barrier. We recommend performing the industry-standard Water Bead Test every six to twelve months. Focus your testing on high-traffic zones like your kitchen, entryway, or mudroom where the seal is most likely to degrade first.
This test is the most reliable way to verify that your invisible shield is still functioning. It allows you to catch thinning protection before a spill becomes a permanent stain. Part of mastering how to maintain sealed grout is recognizing when the barrier has reached the end of its functional life. By being proactive, you avoid the frustration of grout lines discolouring despite your best cleaning efforts.
How to Perform the Water Bead Test
To get an accurate reading, you must start with a clean and dry surface. Pick a small, representative section of grout in a high-use area. Using a dropper or simply your fingertip, place a few drops of water directly onto the grout line. Wait approximately ten to fifteen minutes. During this time, observe the water’s behaviour closely. Do not disturb the drops or attempt to rub them in. This simple diagnostic tool allows you to see the chemical bond at work without needing specialized equipment.
Interpreting the Results
If the water remains beaded on the surface after the time has elapsed, your seal is healthy. The surface tension is holding firm, and you can simply wipe the water away and continue your routine. However, if you notice slow absorption where the grout begins to look slightly damp after ten minutes, the seal is thinning. This is the ideal time to plan for a maintenance visit before the pores are fully exposed. If the grout darkens immediately upon contact with the water, you have a total seal failure. This indicates the grout is absorbing moisture and contaminants directly into its structure. In such cases, professional grout sealing is necessary to restore your floor’s integrity. If your floors fail this test, contact the experts at Sani-Tech Victoria to schedule a professional assessment and ensure your surfaces remain protected.
Professional Restoration: When DIY Maintenance Isn’t Enough
Even with a flawless understanding of how to maintain sealed grout, time eventually takes its toll. Microscopic soil particles can become embedded in the texture of the sealer over years of consistent foot traffic. This is not a failure of your daily cleaning routine; it is simply the reality of floor wear in a busy household. While your regular mopping removes surface debris, a professional “reset” is occasionally required to maintain a truly hygienic environment. Sani-Tech Victoria provides this deep restoration using high-heat steam extraction to lift stubborn, deep-seated grime without ever compromising the integrity of your tile.
Professional resealing offers a level of protection that DIY aerosol cans simply cannot match. Those consumer-grade products often provide uneven coverage and lack the longevity of industrial penetrating sealers. When our specialists handle the application, we ensure total saturation of every grout line. This meticulous approach creates a worry-free finish that lasts significantly longer and makes your daily maintenance much easier. Our local experts in Victoria, Sidney, and Sooke understand the specific needs of Island homes, ensuring your floors are treated with the clinical precision they deserve.
The Sani-Tech Professional Process
Our restoration methodology is built on decades of technical refinement. We begin with a targeted pre-treatment using professional-grade alkaline cleaners. These solutions are designed to emulsify oils and fats that have bonded to the sealer over time. Once the contaminants are loosened, we utilize high-pressure, but strictly regulated, steam extraction. This powerful combination pulls dirt from the depths of the grout lines while simultaneously sanitising the surface. We conclude the process by applying premium, long-lasting penetrating sealers that restore the original beauty and protection of your installation.
Protecting Your Investment Since 1983
We have been the trusted resource for specialized floor care across South-Vancouver Island for over 40 years. This long-standing history in Victoria BC means we have encountered every possible technical challenge related to tile and grout. We are a locally owned and operated business that takes immense pride in our reputation for reliability and excellence. We don’t just clean floors; we provide a high-tier professional solution for homeowners who value quality and longevity. Schedule your professional tile and grout assessment today to ensure your home remains a pristine and healthy environment for years to come.
Ensuring the Longevity of Your Tile Investment
Maintaining your tile surfaces shouldn’t be a source of constant stress. By prioritizing pH-neutral cleaners and performing regular water bead tests, you can extend the life of your floor’s protective barrier significantly. You now possess the professional knowledge required to avoid destructive mistakes like using acidic vinegar or abrasive tools that compromise the seal. Mastering how to maintain sealed grout is the most effective way to ensure your home remains a hygienic, beautiful environment for your family.
Even the most meticulous daily care eventually requires a professional reset to remove deeply embedded soil. Since 1983, Sani-Tech Victoria has served homeowners in Victoria, Sidney, and Sooke with expert grout sealing and restoration services. As a locally owned and operated business, we pride ourselves on providing a premium experience rooted in clinical precision and community trust. When your DIY efforts reach their limit, our high-heat steam extraction can restore that original brilliance without damaging your delicate surfaces.
Book Your Professional Tile and Grout Deep Clean with Sani-Tech Victoria to protect your investment with the region’s most trusted restoration specialists. Your floors are the foundation of your home; let’s work together to keep them looking pristine for years to come.
Frequently Asked Questions
How long does grout sealer take to cure before I can clean it?
Professional penetrating sealers typically require 24 to 48 hours to fully cure before you should perform any wet mopping. While the surface may feel dry to the touch within a few hours, the chemical bond needs time to stabilize deep within the grout pores. Avoid heavy foot traffic or using any cleaning solutions during this critical window to ensure the barrier remains intact for the long term.
Can I use a steam mop on my sealed grout floors?
You should avoid using steam mops on a regular basis as the concentrated heat can eventually degrade the sealer’s bond. While steam is an effective sanitiser, the high temperatures can cause some sealers to soften or flake over time. If you must use steam, keep the mop moving constantly and never let it sit over a single grout line for more than a few seconds.
Why is my sealed grout still turning black or grey in some spots?
Discolouration often occurs when soap residue or dirty mop water settles into the low points of the grout line and dries. If the sealer has failed in those specific areas, the grout is likely absorbing moisture and organic matter. This highlights the importance of learning how to maintain sealed grout through consistent rinsing and using clean microfibre tools rather than traditional string mops that redistribute soil.
Is it possible to over-seal grout or apply too much?
It is indeed possible to apply too much sealer, particularly with topical products which can turn cloudy or “milky” when over-applied. For penetrating sealers, the grout can only absorb a finite amount of liquid. Any excess sealer left on the surface of the tile can dry into a sticky residue that is difficult to remove and attracts dirt immediately.
How often should I have my grout professionally cleaned and resealed in Victoria?
Most homes in the Greater Victoria area benefit from a professional deep clean and reseal every two to three years. High-traffic households with pets or large families may require a “reset” more frequently, while quiet homes might last up to five years. Performing the water bead test is the best way to determine the exact needs of your specific floors.
Will sealing my grout change the colour or appearance of the tile?
Standard penetrating sealers are designed to be invisible and will not change the colour or sheen of your tile or grout. There are “enhancing” sealers available that can darken the grout for a “wet look,” but our specialists typically use clear, natural-finish products. If you are concerned about aesthetics, we always recommend a small inconspicuous test patch before treating the entire room.
Can I apply a new layer of sealer over an old one myself?
You should never apply a new layer of sealer over an old one without first performing a professional deep clean. If you seal over existing dirt or failing sealer, you effectively trap those contaminants and create a patchy, uneven finish. A proper “reset” involves stripping away old residues to ensure the new sealer can penetrate the grout pores effectively.
What is the best way to clean a sealed grout shower to prevent mould?
The most effective way to prevent mould in a sealed shower is to remove standing water immediately after use with a squeegee. Mould thrives on soap scum and lingering moisture, even on protected surfaces. Using a pH-neutral spray and ensuring proper ventilation will keep your shower hygienic and prevent the organic growth that eventually destroys grout integrity.