

You might spend an entire Saturday on your hands and knees with a toothbrush only to find your tile floors look exactly the same forty-eight hours later. It is a common frustration for meticulous homeowners who value a pristine, hygienic living environment. You have likely realized that most viral cleaning hacks simply move dirt around rather than removing it. Learning how to clean dirty grout effectively requires more than just elbow grease. It requires a professional understanding of porous surfaces and the unique humidity challenges we face here on Vancouver Island.
This guide shares the professional-grade secrets to restoring your grout lines to their original brilliance and keeping them that way. We will explore the specific chemistry needed to lift deep-seated oils and the importance of choosing solutions that ensure a truly clinical result. You will gain a clear maintenance routine that actually works and the knowledge to decide when to handle a refresh yourself or when to call in a specialized local expert for a premium, worry-free experience.
Key Takeaways
- Understand why grout acts like a hard sponge and how its porous nature traps microscopic contaminants that standard mopping cannot reach.
- Discover why popular home remedies like vinegar can cause permanent pitting and why knowing how to clean dirty grout safely involves avoiding acidic damage.
- Learn the professional secret of dwell time to allow specialized chemistry to lift deep-seated oils without back-breaking scrubbing.
- Identify the critical difference between penetrating and topical sealers to ensure your restored floors remain liquid-repellent for years to come.
- Recognize when household tools are insufficient and how high-tier steam extraction provides a level of hygiene that manual methods simply cannot replicate.
Understanding Why Grout Gets So Dirty (and Why It Matters)
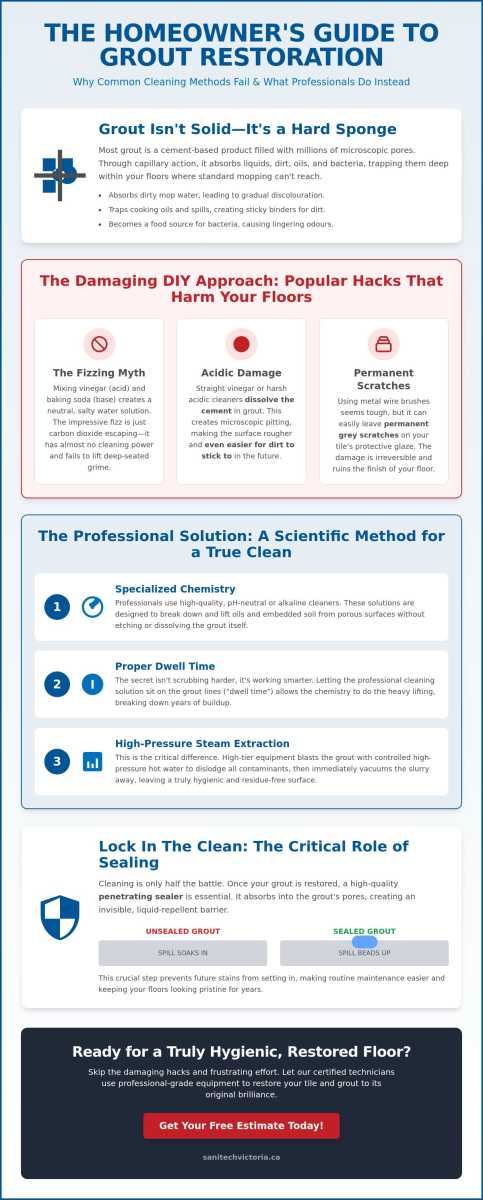
Tile surfaces often project an image of cleanliness while masking a hidden reservoir of contaminants. To understand how to clean dirty grout, you must first understand the material itself. Most homeowners view grout as a solid filler, but it’s actually a highly porous, cement-based product. Its structure contains millions of microscopic voids that pull in liquid through capillary action, making it behave more like a hard sponge than a solid stone.
The Porosity Problem: Why Grout Absorbs Stains
Think of your grout lines as a mineral-based trap for household debris. When you ask what is grout?, you find a mixture of water, cement, and sometimes sand that creates a network of microscopic pores. Sanded grout, typically found in wider floor joints, has larger pores and a rougher texture that traps soil more aggressively than its unsanded counterpart. A common mistake occurs during weekly maintenance; as you mop, the water becomes saturated with silt. Instead of being removed, this dirty water is deposited directly into the grout pores, where it dries and leaves behind a dark, greyish residue. This cycle eventually turns light-coloured grout into a muddy brown that no amount of standard mopping can reverse.
Environmental Factors in South Vancouver Island Homes
Living on the coast presents specific challenges for property maintenance that many general guides overlook. In Sidney and Sooke, the higher ambient humidity often leads to persistent moisture in bathroom grout lines. This moisture acts as a catalyst for mildew growth that penetrates deep into the cement. Beyond humidity, Victoria’s local mineral content contributes to stubborn discolouration. Hard water minerals can create “orange” iron stains or “white” calcium crusts that bond to the grout surface. Learning how to clean dirty grout effectively means accounting for these local mineral variations. In kitchens, the problem is further complicated by aerosolized cooking greases. These oils settle into the grout lines, creating a sticky binder that attracts and holds every speck of dust and skin cell that touches it.
There is a significant difference between surface-level dust and deep-seated bacterial colonies. Surface dirt is primarily a cosmetic issue. Deep-set growth is a hygiene concern. Over time, the organic matter trapped in those microscopic pores becomes a food source for bacteria. Homeowners should realize that this is why grout often develops a lingering odour even after the tiles have been scrubbed. Addressing this requires a professional approach that reaches beyond the surface to extract the source of the contamination and restore a truly hygienic environment.
The Science of Grout: Why Popular DIY Hacks Might Be Ruining Your Floors
Many homeowners reach for vinegar and baking soda when wondering how to clean dirty grout. It’s a popular “green” hack, but the chemistry simply doesn’t support it. Vinegar is an acid and baking soda is a base. When you mix them, they neutralize each other, producing little more than carbon dioxide gas and water. You’re left with a salty solution that lacks the surfactant power needed to actually lift soil. While the fizzing looks impressive, it isn’t doing the heavy lifting you expect for a truly hygienic result.
The real danger lies in using undiluted acidic cleaners like vinegar or lemon juice. Grout is fundamentally a cementitious product containing calcium carbonate. As the Tile Council of North America explains, acidic cleaners actually dissolve the cement binder that holds the grout together. This process, known as etching, creates microscopic pits in the surface. These pits increase the surface area of the grout lines, effectively creating even more places for dirt and bacteria to hide. What starts as a cleaning attempt ends up making the floor harder to maintain in the long run.
The Danger of Acidic Cleaners
Continuous use of acidic solutions leads to structural degradation. You might notice the grout becoming sandy or recessed over time. This pitting isn’t just a cosmetic flaw; it weakens the bond between your tiles. Additionally, many people pair these harsh acids with metal wire brushes. This is a recipe for disaster. Steel bristles can easily scratch the glaze on ceramic or porcelain tiles, leaving permanent grey marks that no cleaner can remove. Always opt for stiff nylon brushes to protect your investment and maintain the integrity of the tile’s finish.
Choosing the Right Chemistry for the Job
Effective restoration requires matching the cleaner to the specific contaminant. In kitchen areas, where aerosolized grease is the primary culprit, an alkaline cleaner is necessary to break down the oils. For a detailed, step-by-step approach to tackling this specific challenge, our kitchen grout cleaning checklist for Victoria homeowners covers the professional two-stage emulsification method in full. For bathrooms, oxygenated cleaners (hydrogen peroxide based) are far superior to chlorine bleach. Chlorine bleach often just masks stains by removing colour, whereas oxygen bleach creates a bubbling action that physically lifts organic matter out of the pores. Understanding these chemical differences is essential when learning how to clean dirty grout without causing irreversible damage. For daily maintenance, a pH-neutral cleaner is the only way to ensure you aren’t slowly dissolving your floors. If your grout has already suffered from years of improper DIY methods, a professional Grout and Tile Cleaning service can often stabilize the surface and extract the deep-set grime that household chemicals can no longer reach.
The Step-by-Step Guide to Safely Cleaning Grout Lines
Restoring the original colour of your floors requires a systematic approach that prioritizes chemical efficiency over brute force. Before you begin the process of how to clean dirty grout, you must clear the area of all loose debris. Dry-vacuuming the floor is an essential first step. This prevents you from simply turning surface dust into a muddy paste that settles deeper into the porous grout lines. Once the surface is clear, your success depends on choosing a cleaning agent that matches the specific type of soil present in your home.
Tier 1: The Mild Restoration Method
For light staining or routine brightening in areas like laundry rooms, a combination of baking soda and hydrogen peroxide is highly effective. Create a thick paste and apply it directly to the grout lines using a soft-bristled nylon brush. The hydrogen peroxide acts as an oxygenating agent, lifting organic matter without the harsh odours or structural damage associated with chlorine bleach. Allow the paste to sit for at least ten minutes. This period of dwell time is the secret to professional results. Finally, rinse the area with warm water and dry it immediately with a clean microfibre cloth to prevent streaks or water spots.
Tier 2: Tackling Stubborn Grease and Grime
Kitchen floors often require an alkaline-based cleaner to break through aerosolized cooking oils and heavy foot traffic. When dealing with these stubborn areas, work in small sections of approximately 2×2 feet. This ensures the cleaning solution remains wet and active on the surface. If you use a home steam mop, apply it only after the chemical cleaner has had time to emulsify the grease. The heat helps to loosen deep-set oils, making them easier to extract. However, be cautious not to use excessive pressure, as high-pressure steam can sometimes blow out weakened grout joints. For a comprehensive room-by-room approach to these persistent grease deposits, the meticulous kitchen grout cleaning guide for Victoria homeowners outlines a repeatable routine that delivers consistent results.
Essential Tools for the Meticulous Homeowner
The tools you choose will define the quality of your finish. A dedicated grout brush is far superior to an old toothbrush. Its stiff, angled bristles are designed to reach the bottom of the grout channel where dirt accumulates. To achieve a truly clinical level of clean, consider using a wet-dry vacuum to extract the dirty slurry after scrubbing. Wiping with a cloth often leaves behind a thin film of residue that attracts new dirt immediately. For a deeper understanding of maintaining your hard surfaces, you may find our guide on Mastering Ceramic Tile Cleaning helpful for your long-term maintenance strategy. Ensuring you rinse and neutralize the floor with clean water is the final, non-negotiable step to prevent a sticky residue from forming.
Beyond the Scrub: Why Sealing Is the Only Way to Keep Grout Clean
Meticulous homeowners often focus solely on how to clean dirty grout, believing the job is finished once the stains vanish. This is a mistake. Cleaning is only the first half of a proper restoration. Without a protective barrier, those newly opened pores are vulnerable to immediate re-contamination. Grout is naturally absorbent; it will pull in spilled coffee, pet accidents, or dirty mop water almost instantly if left unprotected.
A high-quality sealer works by filling the microscopic voids within the cement, creating a liquid-repellent barrier. There are two primary types of sealers available for residential use. Penetrating, or impregnating, sealers sink deep into the grout lines to protect from within without changing the appearance of your tile. Topical sealers sit on the surface and can provide a glossy finish, though they may wear down more quickly in high-traffic hallways. For most Victoria homes, a professional-grade penetrating sealer offers the best balance of longevity and aesthetics.
You can easily verify the state of your protection with the water droplet test. Place a few drops of water on your grout lines in several areas, especially near the kitchen sink or entryway. If the water beads up on the surface, your sealer is intact. If it disappears into the grout within seconds, your floor is unprotected. Investing in a professional seal reduces the frequency of deep cleans, saving you significant labour and replacement costs over the life of your floor.
The Difference Between Cleaning and Protecting
Cleaning removes the soil, but sealing prevents its return. Unsealed grout will often re-stain within weeks of a deep clean because the pores remain open. A proper seal makes your weekly maintenance much more effective by keeping dirt on the surface where it can be easily wiped away. This is why Professional Grout Sealing is a standard recommendation after any deep restoration. It transforms a porous, difficult-to-clean surface into a resilient, hygienic one.
How to Apply Grout Sealer Like a Pro
Successful sealing requires patience and the right environmental conditions. Your grout must be completely dry before application, which typically takes 24 to 48 hours after a deep clean. If you seal damp grout, you trap moisture inside, which can lead to cloudy discolouration or even mould growth. Use a brush-on applicator for maximum precision, and always wipe away any excess sealer from the tile surfaces within a few minutes. If left to dry on the tile, the sealer can create a stubborn film known as hazing. For a truly worry-free experience and a clinical finish, consider a professional Tile Sealing service to ensure every line is perfectly protected.
When to Call the Pros: The Sani-Tech Victoria Professional Extraction Advantage
Even the most dedicated homeowners eventually encounter surfaces that refuse to respond to manual efforts. You might find that despite following every best practice on how to clean dirty grout, certain areas remain stubbornly discoloured or shadowy. This typically indicates that contaminants have migrated so deep into the cement structure that surface-level scrubbing can no longer reach them. When your grout looks dark even when dry or begins to emit a faint, musty odour, it has reached the point where only professional extraction can restore its integrity.
Attempting to force a result with increasingly harsh chemicals at this stage often leads to the pitting and structural damage discussed in earlier sections. For over 40 years, Sani-Tech Victoria has served as the meticulous local expert for property owners who value a clinical level of clean. We provide a comprehensive solution that moves beyond the limitations of household tools, ensuring your floors aren’t just visually bright but truly hygienic from the inside out.
Commercial-Grade Heat and Pressure
The primary difference between a DIY project and a professional restoration lies in the equipment. While household steam mops provide a small amount of heat, they lack the extraction power to remove the emulsified soil. Sani-Tech utilizes truck-mounted systems that generate steam exceeding 200 degrees Fahrenheit. This extreme heat liquefies grease and kills bacteria instantly. Our high-pressure vacuum system then extracts the dirty slurry immediately, removing 99% of contaminants. This process is significantly safer for delicate natural stone tiles, as the heat and vacuum do the work that would otherwise require damaging physical force.
A Worry-Free Experience for Local Homeowners
We take immense pride in our long-standing reputation across South Vancouver Island. Our technicians possess deep local expertise, understanding the specific mineral challenges faced by residents in Sidney, Sooke, and Mill Bay. We prioritize the well-being of your household by offering organic cleaning options that are safe for both children and pets. Our “Clean and Seal” package provides total peace of mind, combining deep extraction with the premium protective barriers necessary for lasting results. For a detailed breakdown of what to expect during a visit, you can consult our guide on Professional Tile and Grout Cleaning in Victoria. Entrusting your home to a seasoned specialist ensures a premium, worry-free experience that preserves your investment for decades to come.
Achieving a Lasting Professional Finish
Maintaining a hygienic home starts with understanding the porous nature of your surfaces. You have learned that the secret to how to clean dirty grout lies in matching the correct chemistry to the soil type while avoiding the structural damage caused by acidic DIY hacks. True restoration is never just about the scrub. It is about protecting those results with a high-tier penetrating sealer that keeps contaminants on the surface where they belong.
When home methods reach their limit, professional intervention provides the clinical results your property deserves. Sani-Tech Victoria has served South-Vancouver Island since 1983 as an independent, locally owned business. Our restoration specialists utilize truck-mounted extraction to reach deep into the pores, ensuring a level of hygiene that manual scrubbing simply cannot match. We take pride in being the region’s trusted resource for meticulous property maintenance.
Restore your floors with a professional Tile and Grout Deep Clean from Sani-Tech Victoria. You deserve a home that feels as pristine as it looks. Take the first step toward a worry-free, long-lasting finish today.
Frequently Asked Questions
Can I use a steam mop to clean my grout every week?
You should avoid using a steam mop for weekly maintenance. While the heat is effective for occasional deep restoration, frequent exposure to high-pressure steam can degrade the grout’s cement binder and strip away protective sealers. For regular upkeep, a pH-neutral floor cleaner and a microfibre mop are much safer choices that won’t compromise the structural integrity of your tile joints over time.
How long does it take for professional grout cleaning to dry?
Professional grout cleaning typically requires two to four hours of drying time before it is safe for light foot traffic. However, if you are planning to apply a sealer, the grout must be completely dry, which usually takes between 24 and 48 hours. Factors such as humidity levels in Victoria or Sidney and the amount of ventilation in the room will influence these specific drying windows.
Is it better to use bleach or hydrogen peroxide on white grout?
Hydrogen peroxide is the superior choice for white grout restoration. Unlike chlorine bleach, which only removes the pigment from stains, hydrogen peroxide creates a bubbling action that physically lifts organic matter out of the pores. It’s also much safer for the environment and doesn’t produce the harsh, toxic fumes associated with bleach, making it ideal for maintaining a hygienic home.
Why does my grout look clean when wet but dirty when dry?
Embedded silt and mineral deposits become visible only when the moisture evaporates from the porous cement. When your floors are wet, the water fills the microscopic voids and changes how light reflects off the surface, often making the grout appear darker and more uniform. Once dry, the light reflects off the trapped dirt and residue again, revealing the true state of your dirty grout lines.
How often should I have my tile and grout professionally sealed?
Most residential floors require professional sealing every one to three years to maintain a liquid-repellent barrier. High-traffic areas like kitchens, mudrooms, and entryways in Sooke or Mill Bay will likely need attention closer to the one-year mark. Guest bathrooms or areas with minimal foot traffic can often go longer between applications, provided you use the water droplet test described earlier to check the sealer’s integrity.
Will professional cleaning fix cracked or missing grout?
Professional extraction focuses on removing soil and bacteria but cannot repair structural damage like cracks or missing sections. If your grout is crumbling, it often indicates a failure in the original installation or movement in the subfloor. Cleaning is a vital first step before any re-grouting or repair work, as it ensures the new material bonds properly to a clinical, debris-free surface.
Is grout cleaning safe for natural stone like marble or slate?
Grout cleaning is safe for natural stone provided the technician uses specialized, pH-neutral solutions. Marble, slate, and limestone are highly sensitive to acids, which can cause permanent etching and dullness. When researching how to clean dirty grout in these specialized environments, always ensure the products are specifically labelled for natural stone to avoid the irreversible damage caused by standard household cleaners.
What is the best daily cleaner to prevent grout buildup?
A high-quality, pH-neutral cleaner is the most effective tool for preventing daily buildup. You should strictly avoid soap-based cleaners or “mop and shine” products, as these leave behind a sticky film that acts as a magnet for dust and oils. Using a clean microfibre mop with a neutral solution ensures that you are removing soil rather than simply redistributing it into the porous grout lines.